
How to get your Website to the TOP of Google Search Results for FREE
How to Get your Website to the TOP of Google Search Results for FREE
Welcome back to the latest part in this training series on how to build a business online.
So if you remember, I showed you how to find a product to promote in our previous training.
In today’s training, you’ll see how get your website to the top of Google search results.
Or more specifically, how to do your on-page SEO for your WordPress website.
Now This Is Important…
To get the most out of this, make sure you’ve implemented the previous training in this series.
Otherwise, you’re not going to get the optimal results & miss out on those 1st place rankings
So if you’re new here, I urge you go through the free training series first.
You can find all the corresponding modules here:
>>> Click Here to Access Previous Modules <<<
Once you’ve gone through that, we can finally begin today’s free training.
So with that said, here’s how get your website to the top of Google search results…
What You’ll Be Learning Today:
(Click any of the links below to jump to that part of the training)
- Watch Training in Video Format
- Step 1. Setting Up Yoast WordPress Plugin
- Step 2. How to Write a Headline Optimized for SEO
- Step 3. How to Optimize your Permalink/Slug for SEO
- Step 4. Optimizing your Meta Description for Optimal SEO
- Step 5. Article Length, Keyword Density & header Tags
- Step 6. How to Optimize your Images by reducing File Size
- Step 7. How to Optimize your Images using Keywords
- Step 8. Adding Internal Links
Watch Training in Video Format
If you prefer to consume your training via video, then you can get the video version here:How to do On-Page Optimization in SEO for WordPress & get TOP Rankings – Step by Step Guide [PART 7]
Watch this video on YouTube
Once you’ve optimised your post for SEO, you can start the next module here:
However, if you prefer reading, then here’s the text version of this training…
Step 1. Setting Up Yoast WordPress Plugin
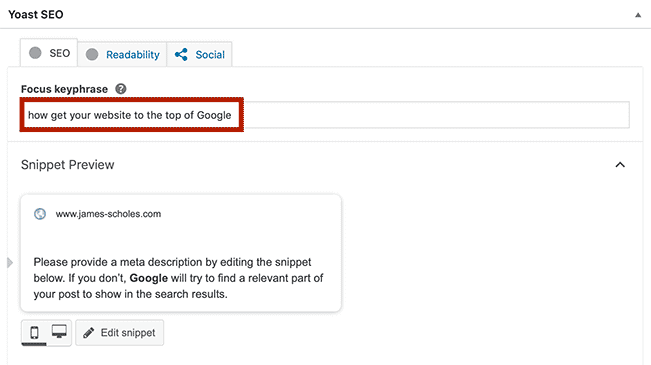
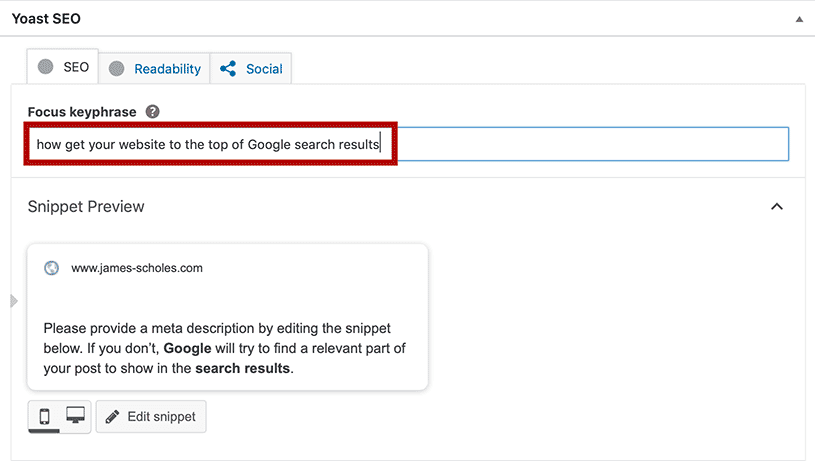
The first step is to enter the keyword we researched previously into Yoast while in “Post Editor”.
To do this, start a new post, then scroll down until you see the “Yoast SEO” section.
Select the “SEO” tab then enter your keyword in the “Focus Keyword” section:
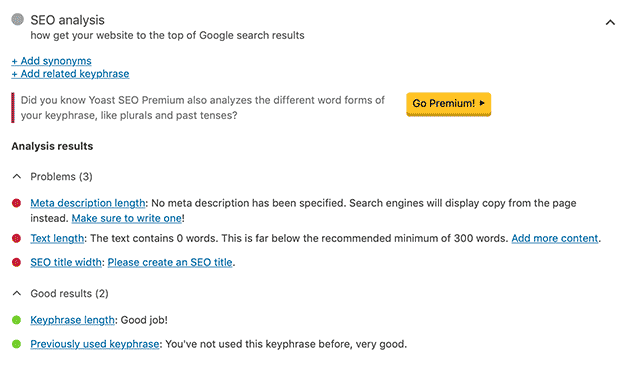
Then click on “SEO analysis” tab below to open up the SEO checklist as well.
As you can see, this will show you how optimized for SEO your post is for this keyword.
Once you’ve done that, we can move onto the next step…
Step 2. How to Write a SEO Optimized Headline
The next step is to write a headline optimized for SEO.
To do this, head to Google and enter your keyword into the search bar.
When you do this, Google will suggest variations & long tail versions for that keyword:
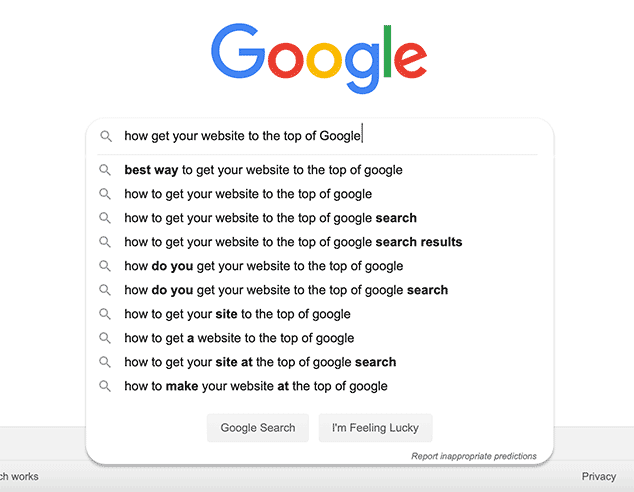
What we want to do is to find the longest version that relates to the topic your post is about.
And generally, the higher up a keyword is in the suggester, the more searches it generally gets.
So press the “down arrow” key until you get to a keyword that relates to your topic.
Then press “spacebar” & see if it brings up an even longer tail keyword that relates to your post.
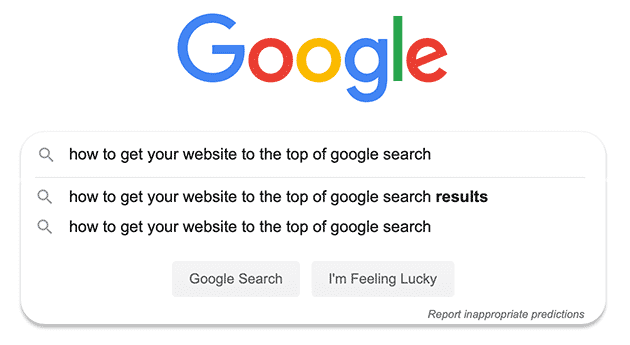
If so, scroll down to the nearest keyword that relates to your post & press spacebar again.
Keep doing this until Google suggester runs out of long tail keywords related to your subject.
Once you’ve got the longest keyword related to your post, paste it into the headline section:
Now his is going to be the core of our headline.
Plus, it’ll help to rank for more long tail and variations of our keyword too.
Just keep in mind, your headline will be the no:1 factor when it comes to click through rate.
So we need to make your headline as interesting as possible, while keeping the keyword intact.
You may not be able to do this due to lack of space, but if you can, then it’s worth doing.
To do this, I recommend deploying two copywriting techniques.
These being:
- Curiosity: something revealed in your article they’ll see when they read it.
- Benefit: tell them the desired outcome they’ll get when they read & apply your article.
If you do this, this should help you to stand out and get a higher click through rate.
A higher the click through rate (and engagement) can get you higher rankings in Google too.
Just keep in mind you need to work within the parameters of what Google gives you.
Thankfully, Yoast SEO plugin makes this easy to do…
If you scroll down to the Yoast SEO section again, you can see what it’ll look like in Google.
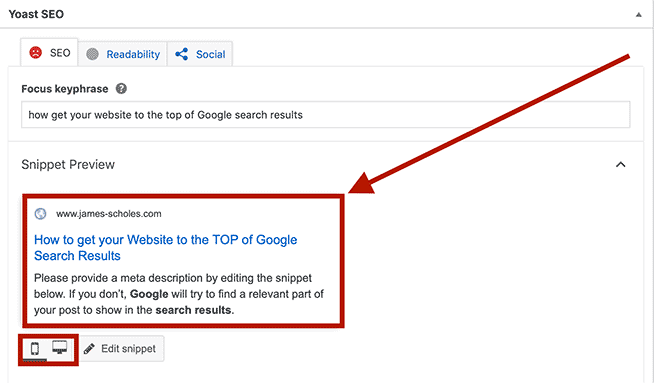
Make sure your headline works for both desktop and mobile versions of Google by the way.
Once you’ve done that, you’re now ready for the next step…
Step 3. How to Optimize your Permalink/Slug for SEO
Another way on how get your website to the top of Google search results is your Permalink.
This is really easy to do, all we do is use the long tail keyword we found in the last step.
Then paste it into either one of the following boxes…
You can either paste the keyword at the top of Post Editor where it says “Permalink”:

…Or you can head down to the “Yoast SEO” section & paste it into the “Slug” section:
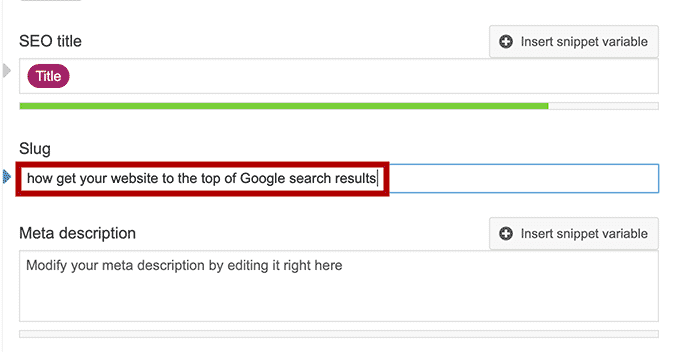
Whichever you one choose, the outcome will be the same.
Also, WordPress will auto hyphenate the URL extension for both of them as well.
Once you’ve done that, then you’re ready for the next step…
Step 4. Optimizing your Meta Description for Optimal SEO
The next thing we need to do is optimizing your meta description for your keyword.
Once again, this is very easy to do…
Simply head down to the “Yoast SEO” section in Post Editor again.
Then click on “Edit Snippet” in the “Snippet Preview” section:
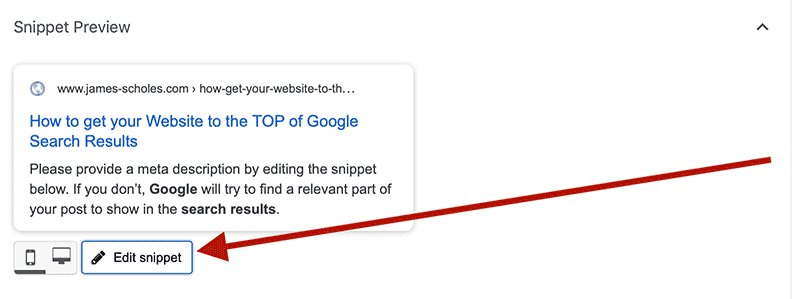
This will open up the Meta Description box in the “Yoast SEO” section.
All you do is enter a brief description what your post is about.
Now when doing this, make sure to use your keyword we found in step 2.
Also, just like your headline, you want to really sell your post in the meta description.
Once again, I recommend using these two copywriting techniques:
- Curiosity: something revealed in your article they’ll see when they read it.
- Benefit: tell them the desired outcome they’ll get when they read & apply your article.
This should be a lot easier to apply than the headline as you’ve got a lot more space this time.
Just keep in mind Google doesn’t always show your meta description in their search results.
Sometimes, they’ll take another snippet from your post they think best describes your article.
However, if you use your keyword, the chance of Google using it goes up considerably.
Step 5. Article Length, Keyword Density & header Tags
First up, article length…
This one is quite tricky to talk about as there’s no real right or wrong answer.
Lots of SEOs say you should write your articles 2000 or more words to get them ranked.
What I would say is to focus on getting your visitor a solution to their problem instead.
But not only that, you want to help them get a solution in quickest & easiest way possible.
So you need to make your articles as detailed and easy to follow as you can.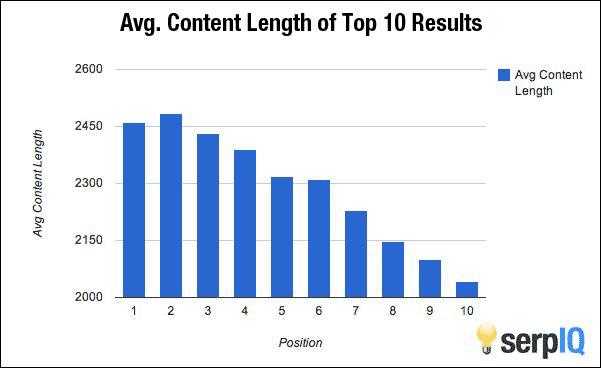
Generally, posts with higher word counts rank higher in Google search results. That said, don’t just write lots of words because they rank higher in Google. Instead, focus on delivering more value. When you do this, your word count will naturally go up rather than artificially forcing it up. This will improve engagement which should reward you with better rankings in the long run.
This’ll involve going in-depth & drilling down into the tiny details everyone else grosses over.
Adding lots of images to explain the process will help to make your posts easier to follow too.
When you do this, your word count will naturally go up without artificially forcing it up.
Plus, you’ll rank for more long tail keywords as you’ll be covering more topics in your posts.
If you need a few examples, I recommend checking out a few of my posts:
- How to Find HIGH Authority Expired Domains with Traffic for FREE
- How to do Keyword Research for Niche Sites for FREE with Ubersuggest
- How to INCREASE WordPress Website Speed in Mobile for FREE
So the big take-away is this…
I guess what I’m saying is; focus on massive over-delivery when writing your blogposts.
If you do this, Google will reward you with higher rankings & will send you more traffic.
Also, you’ll build more natural backlinks because people will want to link to your site.
Keyword Density
I would aim to embed your keyword in your article roughly every 400 – 500 words.
Also, I would recommend using synonyms of your keywords in your posts as well.
Synonyms are basically different words that mean the same or have a similar meaning.
For example, here’s some synonyms for the word “big”:
- Massive
- Huge
- Large
- Enormous
- Gigantic
So say I wanted to rank for this keyword:
- How get your website to the top of Google search results
Then I could use phrases like this in my article:
- How to get a site to rank in Google search
- Getting a webpage 1st in Google SERP
- How can I get my blogpost first page on Google results
So mixing in synonyms of your keyword can help you rank for more variations of your keyword.
If you’re struggling to find synonyms for your keyword, you can use this free tool here:
Just enter the keyword & this site will generate plenty of synonyms you can use: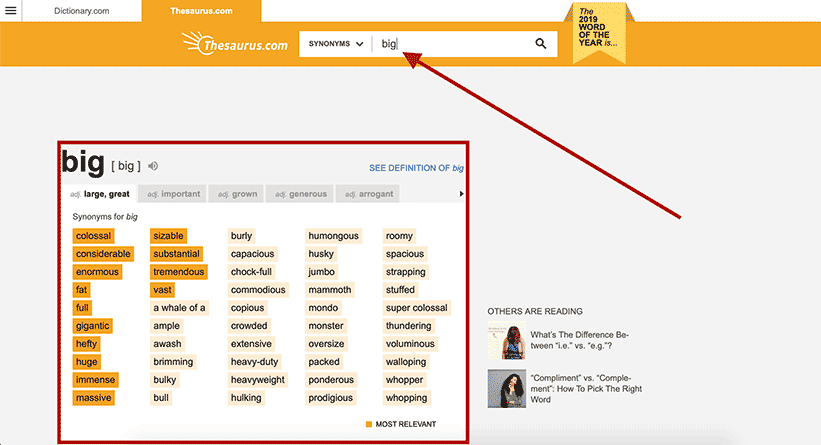
Using synonyms along with your keywords can help you rank for more variations of your keyword, therefore driving you even more traffic from Google.
But yeah, if you do this, it’ll really help with getting your site to the top of the search results.
Header Tags
When writing your blogpost, make sure to use header tags.
Not only will it help to break up your post, making it easier to read, but it can help with SEO too.
Header tags come in a hierarchy of 6 sizes as well…
Header 1 being the most important, right down to the least important, header 6.
You don’t need to use them all, in fact, I would only use header 1 to 3 and skip the rest.
Just make sure when you use header 1 and 2 to place your keyword to get an SEO benefit.
Also, you only want to use header 1 and 2 tags once per article.
Then use header 3 for the rest of your headers.
Step 6. How to Optimize your Images by reducing File Size
Next up on how get your website to the top of Google search results is optimizing images.
Now in the previous training, you should have installed the Smush WordPress plugin.
Smush will automatically shrink your images so they’ll load faster, which will help with SEO.
However, if you want to take it further, I recommend manually shrinking the images yourself.
To do this, you will need photo editing software to shrink and optimize the images.
Me personally, I optimize all the images in my post using Photoshop.
It’ll be different if you’re using another photo editor but I’ll show you how I do it with Photoshop.
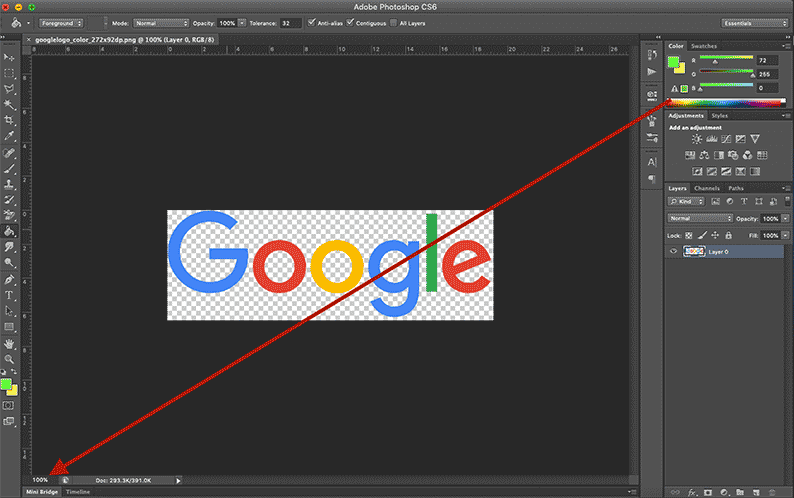
So obviously, I would start up Photoshop and drag & drop the image I want to optimize.
Then I would set the image to full size by setting this to “100”:
I would go to “Image” then “Image Size”:
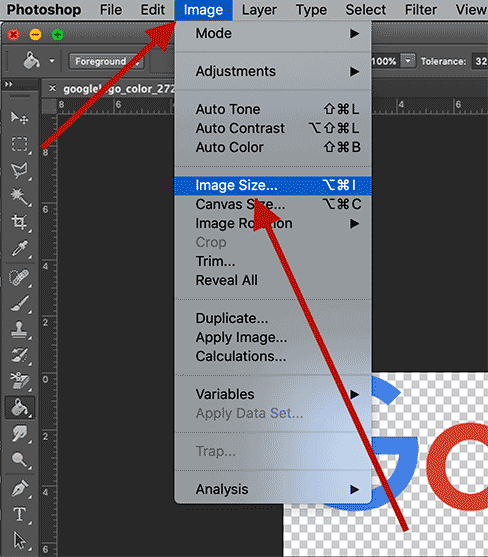
Then select “Percent” & take a rough guess what percentage I want to shrink the image to:
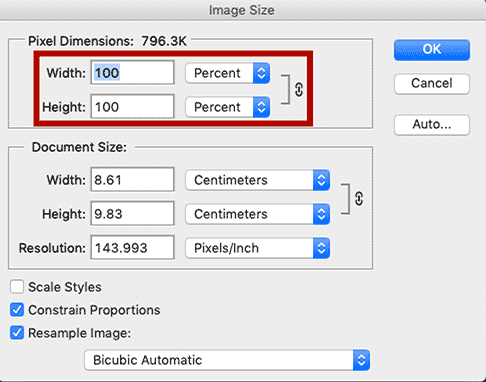
I’d then click on “OK” and Photoshop should then shrink the image to that exact size.
If your happy with it, great, if not, then “Step Backwards” in the Edit tab & do it again.
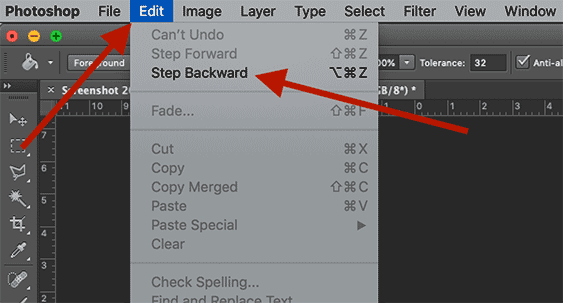
It’s always better that the image is a little big rather than a little too small by the way.
If it’s too small, you will have to enlarge the image in Post Editor & it’ll result in a blurrier image.
Anyway…
Once you’re happy with the image size, go to the “File” tab then “Save for Web”:
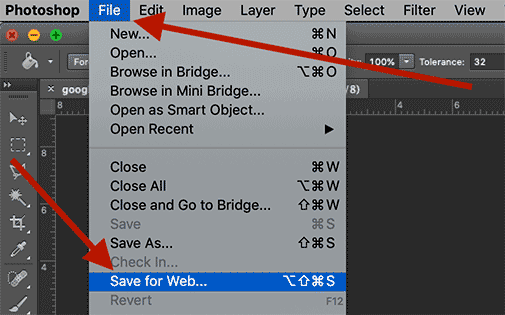
What we need to do now is further optimize by shrinking the file size even further.
So when applying the up & coming settings, you need to keep an eye on this number here:
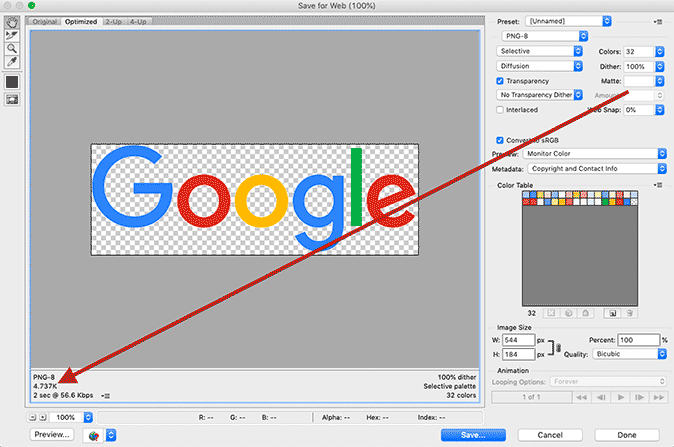
The lower you can get this number, the more optimized & faster loading the image will become.
Just keep in mind, the lower you the number, the lower the image quality becomes.
So it’s all about getting that perfect balance of image quality and image file size.
If the image has low a color count like symbols, logos etc, then PNG-8 is the best.
Then you would go to “Color” & put it to the lowest setting you can:
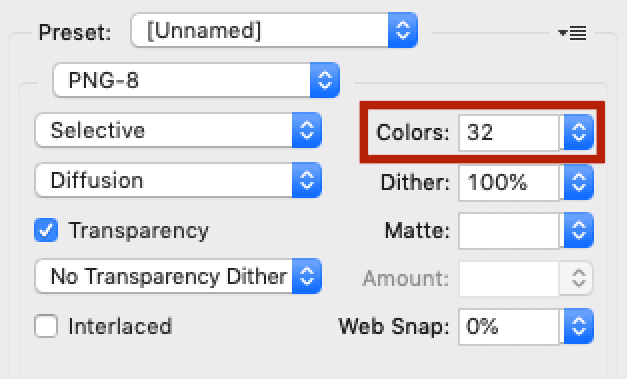
Depending on the image, I find “32” or even “16” is the optimal setting.
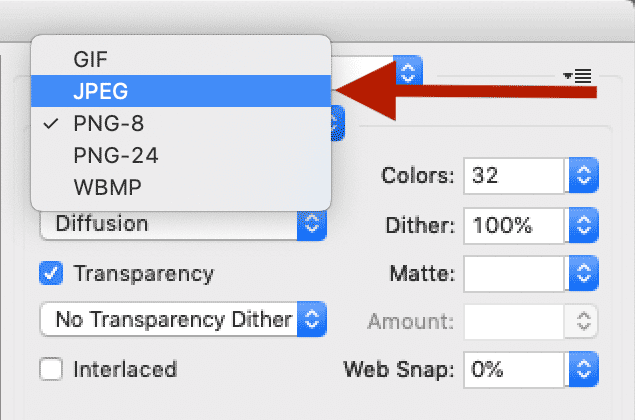
However, if the image has lots of colors like photos of people etc, then PNG-8 may not work.
If so, then I would opt for “JPEG” instead as it’ll give you more colors without upping file size:
Once you’ve got the file size down to the lowest you can without losing quality, press “Done”:
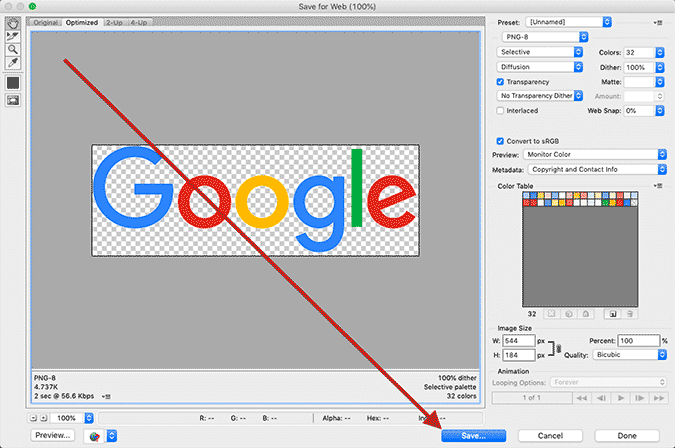
Then save to your computer.
Once you’ve done that, you’re now ready for second part of optimising your images…
Step 7. How to Optimize your Images using Keywords
Now that we’ve shrank our images, we now need to optimize our images with our keywords.
The first way to do this is to simply rename the files with your keyword.
Here’s how to do it…
Renaming the Image Filename with Keyword
Basically, you take the keyword we got in step 2 & change the spaces with hyphens instead.
Then I would put some random numbers next to it to make the filename unique.
So for example, say if my keyword was this:
- How to get your Website to the TOP of Google Search Results
Then the filename for my first image would be:
- How-to-get-your-Website-to-the-TOP-of-Google-Search-Results-65757859
And like I said before…
Each image would get its own unique number at the end as you can’t use duplicate names.
Once you’ve done that, you can simply upload the image through your Post Editor.
Optimizing Images in the Image Details Section
Once you’ve uploaded image, we now need to edit the “Image Details” section.
To do this, click on the image you want to optimize.
A small popup will then appear & you simply click “Edit”:

Then a new window called “Image Details” will appear.
Here’s a breakdown of the parts you need to pay attention to:
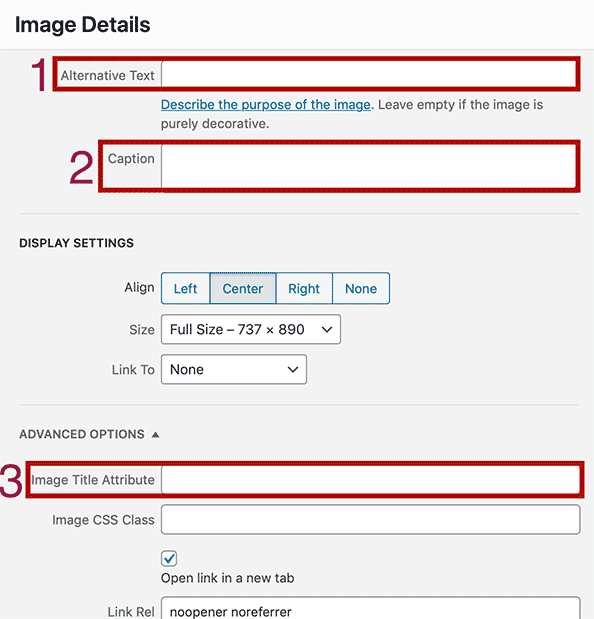
- Alternative Text: gives a brief description to Google what is happening in the image
- Caption: Add additional info if you want to give more context to the image
- Image Title Attribute: Same as “Alternative Text” but the info appears as a popup
Now to optimize these 3 settings for your images, use your keyword in 40% of your images.
For the remaining 60% of the images, leave them blank or use synonyms of your keyword.
Like I said in step 5, if you’re struggling to find synonyms, use this free too to find them:
Step 8. Adding Internal Links
Next up on how get your website to the top of Google search results is adding internal links.
The reason why internal links boost rankings is because it actually lowers your bounce rate.
Bounce rate basically means people visiting your site then leaving without visiting other pages.
So what you need to do is link to other pages on your site whenever possible.
If you do this, people will start to visit other pages on your site & lower your bounce rate.
After a while, your engagement rate will start to go up & can increase your Google rankings.
If you want an example, than go no further than this very post…
You’ll see numerous time I’m linking to other posts whenever it’s relevant to do so.
There is Another Benefits to Internal Links too…
Another benefit to internal links is that it can pass link juice to other posts on your website.
This will help to further push those pages higher up in the Google search results too.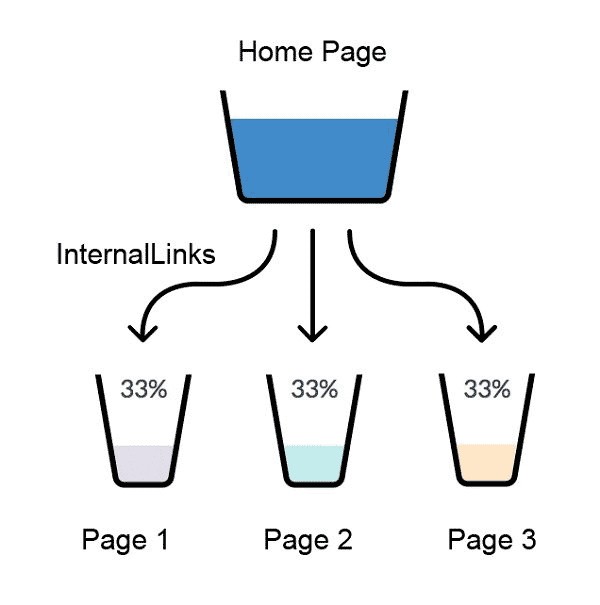
Always link to other posts on your site whenever relevant as it’ll help those posts to rank higher in the Google search results.
They won’t be as effective as links from external sites but it’s still helps none the less.
So link to other relevant pages whenever possible to improve engagement & rankings.
And that’s it…
…That’s How to Get your Website to the TOP of Google Search Results for FREE 🙂
So put this into action and let me know how it goes for you.
Just make sure you apply the previous training in this series for optimal SEO performance.
At the end of the day…
It’s never one thing but an cumulation of everything combined where the magic happens.
One trick or hack will never cut it in this game, despite what some will have you believe.
Once you’ve optimised your post for SEO, then you can start the next module here:
Anyway…
If you’ve got any questions about ranking your site in Google, let me know down below…
I’ll do my best to help you overcome your sticking points so you can get results faster.
First Time Here?
If so, then I recommend signing up to my newsletter…
You’ll be notified when I post the next part in this training series.
Plus, you’ll get my latest course absolutely free too.
This free course will show you how to make money from home using free methods.
I think you’ll absolutely love it when you see it as I’m getting great feedback about it so far.
So if you want to be notified & get that free course, you can sign up for free here.
With that said, thanks for stopping by and I’ll see you in the next part in this series soon 🙂
Cheerio,
James Scholes
How to Get your Website to the TOP of Google Search Results for FREE


